Editing an Existing Role and its Cabinet
When user holding the role changes or Role’s Properties changes (Security Grading / Job Title) etc, System Administrator / User Administrator needs to make the necessary changes so that the user will be accessed to the right information in KRIS.
Changing the Role for a user
- Login as System/User Administrator
- Click on Module Switcher at the top bar and select KRIS Administrator module.
- Click on Manage Role link under Manage Organization Structure section.
- Expand the All Roles tree view.
- Right click on the role that the user is currently holding and click on Edit option.
- Under the Trusted Officer section, click on Edit button.

- Select a user from Available Officer list and click on Add button to add as a new role member OR
- Select a user from Selected Officer list and click on Remove to remove him from this role.
- Click on the OK button to save the changes.
Editing Role Properties
- Click on Manage Role link under Manage Organization Structure section.
- Expand the All Roles tree view.
- Right click on the role that the user is currently holding and click on Edit option.
- Update the Role’s Details.

- Optional Filing – To turn on/off the Filing Reminder on any emails sent from the users holding this role. The Filing Reminder is only available to Microsoft Outlook application.
- Ignore this field if you are not using the Smart Mail Organizer module
- Click on Trusted Cabinets / Subjects to view / edit the role’s access.
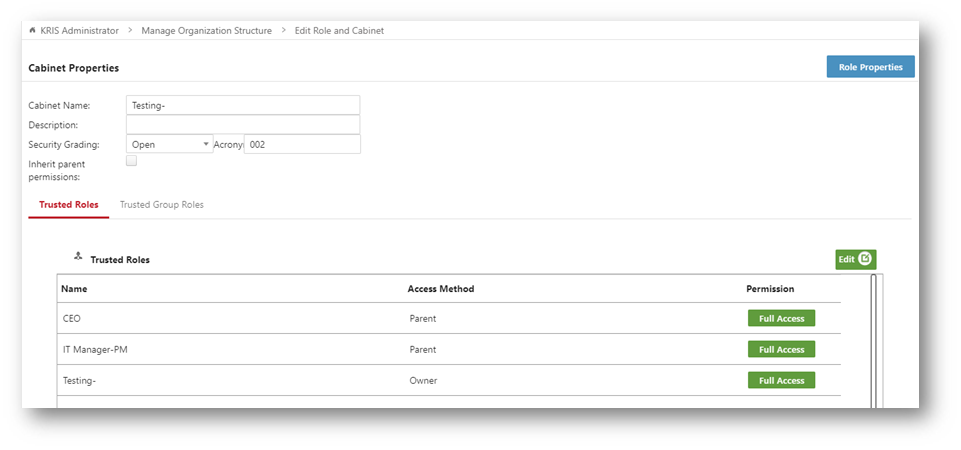
- Click on Cabinet Properties to change the Cabinet’s Details.

- Update the Cabinet’s Details.
- Click on Trusted Roles / Group Roles to view / edit the Cabinet’s access
- Click on Edit to change the Cabinet’s Access List
- Click on Permission such as Full Access to change the Cabinet’s Access Rights
- Click on the Save button to save the changes.
