Creating a New Submission For Approval
To create a new submission for approval,
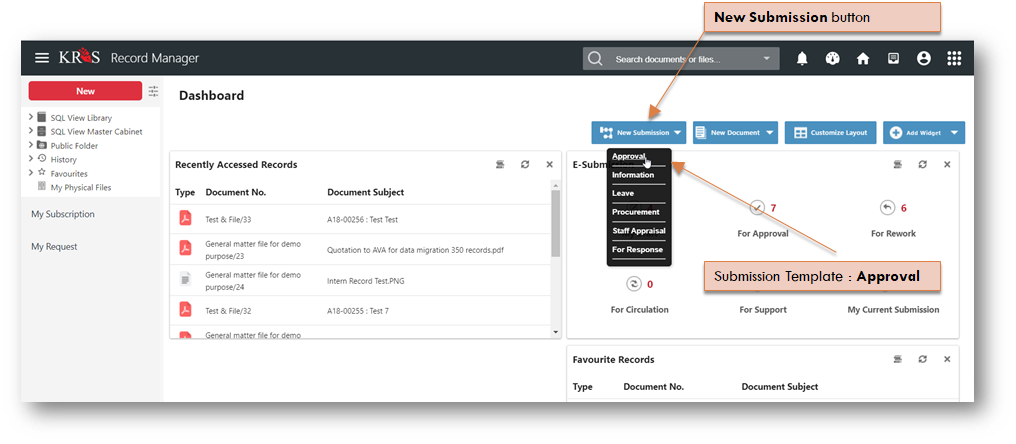
- Click on the New Submission button in Dashboard.
- Click on the submission template that is intended for Approval.
- Note: The name of the submission type can be changed to better describe the different types of approval that are needed for various business needs (e.g. Submission Template is used here is called “Approval“).

- Note: The name of the submission type can be changed to better describe the different types of approval that are needed for various business needs (e.g. Submission Template is used here is called “Approval“).
- A New Submission – Approval Form is displayed. Under the Header Information section, fill up the header information.

- Except for the Title, all the other fields is defaulted.
- Classification refers only to the security grading of its submission.
- Priority refers to the importance of the submission and due date calculation for each routing stage, it is also depends on the values selected. By default, the values include Normal (2 working days to respond) and Urgent (1 working day to respond).
- Under the Main Paper section, enter the full description of the submission.
- Alternatively, you can click on the Upload button to upload your documents in PDF or Word format.

- Alternatively, you can click on the Upload button to upload your documents in PDF or Word format.
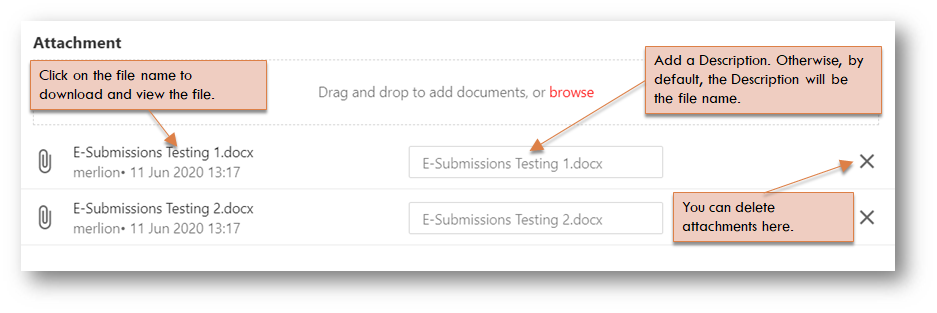
- Under the Attachment section, drag and drop documents or click Browse to select files from your workstation.

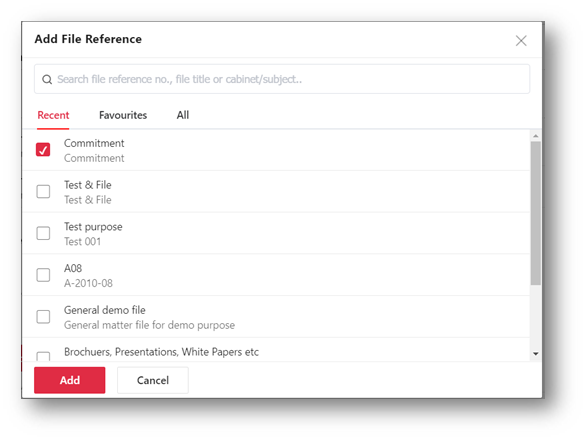
- Under the File Reference section, choose a folder to save the completed submission as record (in PDF format) by clicking the Add button.

- Check on a folder and click Add button and the selected folder will appear in the below lists.

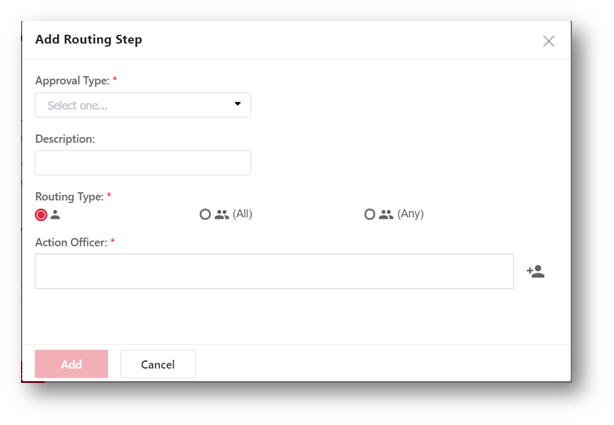
- Under the Routing section, click on the Add Step button to start defining routing stage for your approval.

- In the Add Routing Step pop up window, select the Approval Type for this stage.

- By default, there are two options available for your selection:
- For Support (optional)
- For Approval
- By default, there are two options available for your selection:
- Add a description for this stage if necessary.
- Select the Routing Type for this stage
- Individual refers to assigning to one person for support /approval.
- All refers to assigning to a group of people for support/approval before moving to the next stage of the submission.
- Any refers to assigning to anyone in the group for support/approval before moving to the next stage of the submission.
- Click to add Action Officers icon
 to assign users to act on this submission.
- Select the number of users depending on your Routing Type option and click on the Add Selected button.
- Choose the designation of the selected users if they are holding more than roles in KRIS.
- Repeat Step 8 to Step 14 to create as many support/approval stages as you need in this submission:
- Please note that ‘For Support’ stage must always come below ‘For Approval’ stage.
- The final stage must always be ‘For Approval’.

- Click on the Submit button.
- Click on the Submit button again in the Confirmation window.
Your submission will appear on the My Submission – In Progress section and email notifications are to be sent to inform the users from the current stage in the Routing Profile to process your submission. 
