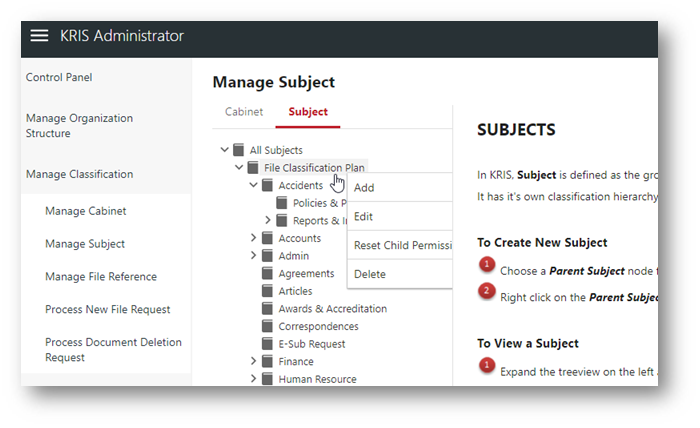
Creating a New Subject
- Login as System / User Administrator
- Click on Module Switcher at the top bar and select KRIS Administrator module.

- Click on Manage Subject link under Manage Classification section.
- Expand the Subject tree view.
- Right click on the Subject where the new Subject is to be structured under and select Add option.

- Filling in the Subject’s Details:
- Subject Name – The name of the Subject. (Note the Name has to be unique in this tree view.)
- Description – Description of the Subject.
- Security Grading – The Security Grading of the Subject. It defines the security clearance required to access documents in this Subject.
- Inherit Parent Permission – Allows the access list to be inherited from the Parent’s Subject. Default settings as configured in the System Settings under Control Panel
- Acronym – Abbreviation of the Subject. (For e.g. CM is the abbreviation for Change Management). The Acronym value is used to auto generate the File No for the files that are created under this Subject. This field will only be shown if the File Creation Method is set to Auto Numbering in the System Settings -> Classification Settings.
- Tag – Additional metadata /category that administrator can assign to this Subject. Administrator will chose from a list of tags are defined in the Tag Administration.
- Select the Security Grading from the drop down list.
- Inherited Roles from the Parent Subject will be auto populated in Chosen list if they match the selected Security Grading
- You cannot remove these inherited roles and change their access rights when Inherited Parent Permission is turned on.

- Choose the role from Available list which will auto populate based on the selected the security grading
- Click on the Access Permission drop down to change the default access permission as defined in the System Settings.

- Click on the Trusted Group Roles tab to add the group role to this Subject Access Control List.
- Click on Save button to save the changes
- Click on OK button to close the Success Message window.

